my favourite interior trends this season

Desember 05, 2017 0

FANCY! Design Blog | NZ Design Blog | Awesome Design, from NZ + The World
The New

As someone who's really into interiors I always love watching new trends emerging and seeing how people incorporate them into their homes. There are so many things I'd like to try myself, and while my own style is some kind of a scandi/mid-century/eclectic mash-up, there is only so much experimenting I can do before my home starts looking like I have multiple personalities! 

And that's where me decorating vicariously through the homes of others comes in. I'm an interiors junkie, and Pinterest is my drug of choice.  So when Chill Insurance contacted me and asked if I'd like to collaborate with them on a post about the latest trends in interiors I just about bit their hand off! Cos if there's one thing I have plenty of guys, it's opinions ;)

There are so many trends doing the rounds right now, from interesting colours like hunter green and millennial pink for walls, to the "grey everything" trend that seems like it might never go away! I found it quite hard to pick my favorites, but I settled on the ones that I've incorporated into my own home, and they are....

Velvet Crush


9 Websites To Find Affordable Yet Chic Decor
Rebecca Fredriksson
Velvet is everywhere this season, and it's the perfect trend to try if you want to keep your home feeling cosy while adding some dramatic, but easy to live with colour. The soft feel of this fabric and the gorgeous jewel colours that it's popping up in at the moment mean it will look and feel amazing in any room that has a fairly neutral palette. Go for a fabulous jade green sofa like the one above if you know what you like, or stick to adding a few blush pink and cranberry cushions to a grey sofa if you're not ready to commit!


Created from a love for craftsmanship and traditional techniques.
Christina Lundsteen


Monochrome

INDUSTRIAL STYLE: LIGHTING FOR YOUR KITCHEN DECORATING IDEAS_see more inspiring articles at http://vintageindustrialstyle.com/industrial-style-lighting-kitchen-decorating-ideas/
Pinterest

I'm a big fan of monochrome, huge! After playing around with different colours when we first bought our house I've come to the realisation that what makes me happiest is a clean, neutral palette. White walls, white cabinets, black and grey accents. However, that doesn't mean that you have to have everything in just black and white. In fact, that would be way too stark for me. In my opinion the best monochrome spaces incorporate a lot of wood and greenery, which both help to really soften the look and stop it from being cold. In my own home I like to have a fairly monochrome base and then add touches of warmer colour like gold and pink to lift the space.


Mother nature

SEAGRASS Belly Baskets | Bohemian Luxe Homewares | dosombre.com
Pinterest

As I said above, I love a neutral palette, but to keep it from being too stark I ALWAYS add some natural texture. No room in my house is complete without some greenery, and I've recently started adding in natural texture with woven baskets, raw wooden frames and soft furnishings in raw cottons and linens. they really bring a room to life, without competing with your neutral backdrop.

And if you have a black thumb and fear the responsibility of so many plant lives being in your hands, just go for a print! I personally LOVE the all over fern print of this bathroom, but if you're a print virgin maybe just start with something in a frame.

So what do you think? Will you be picking up some fab inexpensive velvet pieces? Or being like me and accidentally filling your car with greenery the next time you pop into B&Q?! If you try any of these trends I'd love to see some pics! Share your images in the comments or tag them on Instagram with #interiorinspirations cos I'd love to have a nose :)


*This post is written in collaboration with Chill Insurance

plans for a nautical, cool kids bathroom

Oktober 30, 2017 0


This is a sponsored post. As always, all opinions are my own. I only work with brands I love and I think you'll love too ;)

I know, I know, I barely managed to finish my own bathroom, why am I planning another one? Well folks, this is why....


Yep, that's a light up mermaid sign friends, and it was on sale, so I literally couldn't not buy her. The minute I saw her (in The Range for €15 if you're wondering) I fell head over heels, and I knew I needed her for the kids bathroom. I hadn't had any plans to touch that room ANY time soon but sometimes inspiration hits and you just have to go with it! 

This room is the main bathroom in the house but it's only used by the kids so I can have some fun in here. I want it to be child-friendly, but not childish. So fun, and whimsical, but no primary colours, no plastic, and absolutely, positively, no cartoon characters.

Starting with my beauteous mermaid I want to go with a kind of jules vern, steampunk-y nautical vibe in here, but with a palette of soft blue greens to stop it being too heavy or adult. Here's a basic moodboard to give you an idea of what I'm thinking....


The floor in here is actually the only one in the house that I didn't dislike when we first moved in so it will stay, but I will be refreshing the grout lines. It's a nice deep blue colour, so will work well with the theme.

The wall tiles in here are also fine, so I'll just be painting the walls a nice white, and adding a feature wall of some kind. I'm thinking an ombre scale pattern? The paint colours on the board are Farrow and Ball "All White", "Blue Ground" and "Vardo", and I'm thinking of making some scale shaped stamps and trying to recreate a fish scale pattern using those colours. 

I would be getting the paints mixed in Fleetwood paints though cos....money.

The shower in here only get used to rinse the kids off if one of them decides it's hilarious to pee in the bath to freak the other one out, so I'm going to replace the ugly curtain rail with a prettier, but less practical round curtain rail. The one in the picture is this one from Argos.

I'm hoping to use pallet wood to create a really cool, rustic bath panel which I think will fit in really well with the theme. I'm also going to use pallet wood for shelves, and possibly for some storage crates.

I say "I", like I'll actually have anything to do with that other than nag Gavin until it gets done.

I'll frame a round mirror with rope, and I've seen this great nautical compass wall decoration that I'll pick up. Add some vintage style art, an octopus toilet roll holder and a nautical style light like this one from Lights.ie and we're done!

What do you think? I think it'll be really pretty and fresh, and something that walks the line between what I want and what the kids want, cos I know they're my kids and I love them but they have terrible taste and this is my damn house.


oops I did it again.....painted tile floor 2.0

Oktober 25, 2017 0

how to stencil a tile floor with chalk paint to get the look of Moroccan tile


So you know how I've been saying since the dawn of time that the en-suite is practically finished and I just have to add the finishing touches and it'll be done? 

Well.....somehow last week I went in there to put up a frame and ended up stencilling the floor.

That's how it works around here, I'll put things off for months and then find myself elbow deep in paint at one in the morning, or ripping out manky carpet after just going upstairs to put some washing away. I've learned to just go with it. Gavin has learned to not ask questions. 

If you've been with me for a while you'll know that I painted my kitchen floor to make it less vomit-inducing while we saved up to have it ripped out and replaced. Well, the floor in here was less offensive, but just as dated. I had thought I would just leave it as is, hoping that it would kind of just fade into the background, but then as the rest of the decor in here came together I thought it would be a shame to have the floor sitting there, all beige and boring, ruining the look.

how to stencil a tile floor with chalk paint to get the look of Moroccan tile

So yeah, one day I came up here to put up a few pictures, realised I had a tin of paint, a stencil and two hours of actual free time until I had to pick Max up from playschool. It was a perfect DIY storm, and before I knew what was happening I had a coat of white paint on the floor. 

When I painted the kitchen floor I used primer and actual tile paint, doing two coats of each, and while it did do the job I definitely had to maintain it, touching it up every six weeks or so as little chips appeared in it. Plus the paint was stinky and expensive, so this time I decided to try a different method that I had seen on a lot of American blogs, namely, chalk paint covered by a protective finish, in my case matte water based varnish.


how to stencil a tile floor with chalk paint to get the look of Moroccan tile


how to stencil a tile floor with chalk paint to get the look of Moroccan tile


I thoroughly cleaned the floor and let it dry first, then I cut in around the edges and along the grout lines with a brush before going over the whole floor with a small roller. And here's my first tip, chalk paint dries ridiculously fast, so if I were to do this again I would work in small sections rather than doing the whole floor at once, as I found I had to be very careful not to lift the paint from the areas I had cut in with the wet paint on the roller.


                        how to stencil a tile floor with chalk paint to get the look of Moroccan tile

                       how to stencil a tile floor with chalk paint to get the look of Moroccan tile

I did three coats of white to make sure everything was completely covered, and once that was dry I was ready to start stenciling!

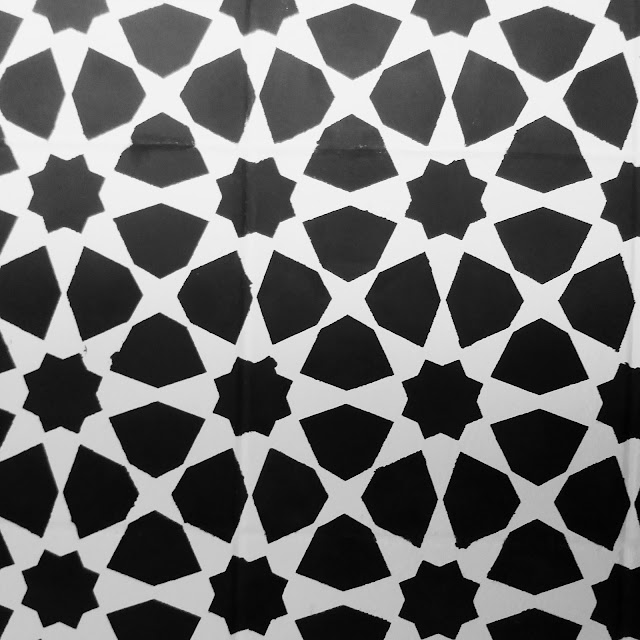
Now, if you've been with me for any length of time you'll know that I don't have the patience for precision unless it's very easy to achieve, so I was more than half convinced that I was going to totally balls this whole thing up. I figured the best way would be to start in the middle and work out, so I eyeballed the centre, stuck it down with frog tape in the corners and got to work.

That's right, no measuring of any kind. It's either pure blind luck that I didn't end up with a total mess or this particular pattern is very forgiving.

                   how to stencil a tile floor with chalk paint to get the look of Moroccan tile

I loaded my roller with the darker paint and then rolled it on some newspaper to get rid of the excess in the hopes of minimising any bleeding underneath the stencil, then firmly rolled it over the stencil until all the shapes were completely filled in. Where the pattern went over a grout line I had to dab at it with a brush to fill it in.

As soon as I was done I lifted the stencil, moved it over until the pattern overlapped perfectly at the side, then stuck it down again and repeated the process. So what I mean is that after the very first one I did there was always a part of the pattern that was already filled in, because I was laying the stencil partially over my previous work. This is what gives you the continuous pattern and helps make sure everything is lined up properly. The paint dried so quickly that I never had a problem with smearing while I was doing this but I did occasionally wipe off the stencil to remove any excess paint that might have seeped under.

I realise that this "overlapping" is the crucial point of this project and probably what I should have taken a million photos of....I don't know what to tell you. I had a couple of hours of kid free time to listen to podcasts, drink coffee and paint and I guess the excitement got to me. So this is all I have......

how to stencil a tile floor with chalk paint to get the look of Moroccan tile


I'm sorry, I hope my shoddy description of the process is enough!


The main parts of the floor went quickly and were relatively painless, but when it got time to get right up to the edges things got a bit trickier. All I did was bend the stencil to get the pattern as close to the edges as I could and roll the paint as normal. I ended up with a small gap the whole way around but it just looks like a grout line. 

                 how to stencil a tile floor with chalk paint to get the look of Moroccan tile


                       how to stencil a tile floor with chalk paint to get the look of Moroccan tile


Once the whole floor was done I went back over it with an artists brush and the white paint and cleaned up the few places where paint had seeped under the stencil like below....

how to stencil a tile floor with chalk paint to get the look of Moroccan tile


Once everything was dry I went over it with three coats of water based matte varnish to protect it. I should point out that the whole time I was working on this I made sure to walk on it as little as possible and when I did need to I wore socks. Chalk paint is incredibly soft and easy to scratch. Like seriously. I managed to scratch the white layer with my bare feet!


how to stencil a tile floor with chalk paint to get the look of Moroccan tile


The varnish goes on milky but dries clear, and while it does give a very slight sheen this was the matte version so it's not too shiny. Using water based varnish meant it was a much quicker process as each coat dried in an hour. Also it wasn't so stinky that it gave me a headache and it shouldn't yellow over time like oil based products do.
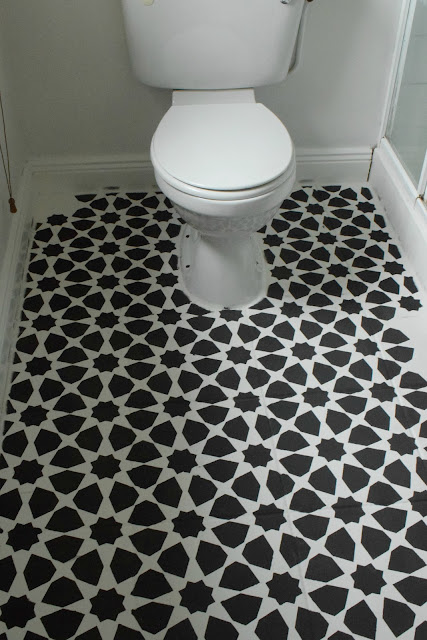
And so it was done!

I have high hopes for this lasting a long time without much upkeep. It already feels sturdier than the kitchen floor ever did, despite the fact that I used specialised products there and in here I'm winging it with products that definitely weren't meant to be used like this. Also it's extremely rare that anyone wears shoes up here, and it's only really cleaned every couple of weeks compared to the daily wear the kitchen got from brushes and mops.

I was honestly surprised at how relatively easy this was, and I'm absolutely delighted with the result. It's a total game changer, and now that I've seen it I can't imagine the space without it! 


What do you think? Have you ever stenciled anything? Will you be giving it a try now? I've put affiliate links to some of the products I used or similar below, and I'd love to see pictures if you end up trying it!

If you liked this post, you might want to check out:


                       how to stencil a tile floor with chalk paint to get the look of Moroccan tile

turning an old dresser into a bathroom vanity

September 29, 2017 0

dresser to bathroom vanity


The en-suite has been plodding on at the speed of a stoned turtle with a gammy leg, but amazingly, finally, I actually have some progress to report! Actually, if I could just get my arse in gear and finish off the last few fiddly bits the bloody thing would actually be finished and I could move on with my life!

But anyway, I really wanted more storage in here. As I talked about in my original post about my plans for this space, the room is a decent size but an awkward shape and there isn't anywhere for free standing storage to fit.  I had originally planned to make Gavin build me a full length, slim cabinet with a mirror on it onto the one small section of clear wall we have, but it didn't happen. I think it just seemed like a lot of work and he wasn't confident about how he would do it,so he wasn't enthusiastic about it, and to be honest it wasn't worth giving up hours of precious free time trying to make something that might not even work.
Click here to read the rest of this post »

profane scrabble art

September 20, 2017 0


I love my kids, but good god they get in the way of DIY! Hopefully someday they will actually be able to help rather than hinder, but for now trying to do anything without them when they're awake is pretty much just pissing into the wind so things are moving at a glacial pace when it comes to actually finishing anything. It's fine. After three kids I know that time to do the things I want is not something that comes easy, or often, and to be honest I've realised that the time I do have is usually better spent looking after myself or spending time with my husband unless I really WANT to do some painting or whatever. It's a work in progress, but I'm getting better at suppressing my control freak tendencies and not letting the to-do list haunt me. 
Click here to read the rest of this post »

updating to add value

Agustus 31, 2017 0


This post is sponsored by Velux Windows


I love my house. After living in tiny apartments all my adult life my heavily pregnant self thought the four bedrooms and a garden this house offered was just about the height of luxury when we moved in. But as happy as I was with it then (and still am now!) it was never intended to be our forever house. I would love to be able to build our own house eventually, somewhere with a bit more privacy. As great as where we live is for the kids with all the other children around here I don't enjoy knowing my neighbours can probably hear me screeching like a lunatic every time we try to leave the house, and some day I'm going to totally lose my shit with the boys who constantly batter our pathetic fledgling hedge with their ball and then we'll HAVE to move. You know how it is.

Click here to read the rest of this post »

so...how's it going?

Agustus 24, 2017 0

becoming a stay at home mom update


It's been well over a year since I packed in my full-time job in order to be able to be home with the kids a lot more, and I thought it was time for an update.

Actually, a friend of mine recently said "you know people at my work regularly ask me how you're getting on, and I tell them you sell vibrators now", and that very random yet accurate description of my current situation made me think that maybe you guys would be interested in what's going on around here at the moment...and what vibrators have to do with it.
Click here to read the rest of this post »
x

Entri yang Diunggulkan

my favourite interior trends this season