Tampilkan postingan dengan label projects. Tampilkan semua postingan

Christmas tress for the space/cheer challenged

Desember 16, 2015 0


Mother o' gawd the weeks are flying by! I know it's been quiet around here of late but between taking a much needed little holiday away and getting my Christmas on with the mini monsters there just hasn't been a lot of time for photo editing and post-writing!

The natural habitat of the toddler is not tidy, and therefore not photo ready

Click here to read the rest of this post »

the ultimate "new kitchen counter" cheat!

Oktober 24, 2015 0
diy super cheap, easy marble look counters done with contact paper. www.makedoanddiy.com

This post contains affiliate links

We've reached the end of the kitchen tutorials now, and I think I've saved one of the best till last. I say best, because this project genuinely surprised me with how easy and effective it was!

I had debated for a long time  over what I was going to do with the counters. What I originally wanted was solid wood butcher block, like we have on the island, and we probably could have afforded it at the time if we installed it ourselves, but the problem was that I hadn't settled on what my idea of the ideal kitchen was. We knew that we would be changing things down the line when we had the money, so it seemed foolish to rip out the old counters to install the ones we wanted now, when we would probably have to rip it all out again next year when we were doing the full renovation.

** update!!! If you'd like to see how my counters are holding up 18 months later you can find that post here

Click here to read the rest of this post »

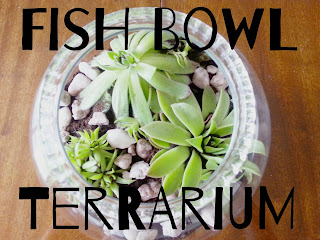
Fish bowl terrarium

Mei 04, 2015 0


Apologies! My laptop had a milk related toddler incident so I haven't been able to post...it does mean I have several projects that are ready and waiting for me to get them on here though :)  #silverlinings


It seems like I keep seeing little glass terrariums with succulents in them all over the internet at the moment, and it's one of those situations where I don't know if I just started noticing them because I decided I loved them and wanted one, or if it really is a new trend and I'm finally getting in  at the start of something! I know which is more likely.... :)


So having seen these all over, and most particularly on one of my favorite blogs, Vintage Revivals I decided that I was going to make one when I got the chance.

 *if you've never visited you need to head over there as soon as you finish reading this because Mandi's style is amazing. Like out of this world, I want to rub myself all over her furniture amazing.......aaaand that just got weird....


 Now, succulents not being in abundant supply here in Limerick I had to content myself with checking every garden center in town every time I passed them, and last week I got lucky (wait for it) in a place called "Lucky Lane" on Catherine st.


It's really cute in there, kind of a craft collective where people sell home baking, up-cycled furniture etc, and there's also a garden section that has lovely plants, and there I found my succulents. I got 3 for €10, so I was fairly happy with myself.


Then all I needed was a glass globe to plant them in, and I figured the easiest (and cheapest!) thing to get was a fish bowl. So off I trotted to the pet shop to get one...only to be faced with nothing but rows of hideous plastic bowls, not the look I was going for! 


I was so annoyed, thinking I was going to have to trek out to the bigger Petmania outside town, but then I called in for my usual look in the Limerick Animal Welfare charity shop (they often have great furniture for ridiculously low prices, like the solid wood mid-century sideboard I picked up for €50....though I did nearly have to fight someone for it) and lo and behold, sitting in the middle of the shelf full of glassware, is a fricking perfect glass fishbowl!!


Seriously, I couldn't believe it, how lucky was that! And the next great thing was I technically got it for free, cos I bought a little copper sugar bowl at the same time, and the lady in the shop thought it was priced a little high (€3!!) so she just charged me that for the two (?!!). I love it when things work out like that! :D


You can just see my little helper in the reflection, as well as me in my pyjamas....glamorous.


So I hauled it home, filled the bottom with gravel and compost, planted my succulents and put in some marble pebbles I gathered when I was walking in the Glen of Aherlow last week. The only thing that went wrong with this is that I'm a novice when it comes to planting so at first I out the compost in and then tried to plant, but I quickly realised that that meant I had way too much soil in there so I had to start over, placing the plants first and then adding the compost around them. I could have avoided a serious mess if I'd realised that beforehand!


So there you have it, I love it! It's now sitting in the middle of my dining table, where I try to always have a plant or flowers, and I think the whole thing looks really modern, but in a retro way which works really well with the Eames inspired chairs and the Ikea lighting in there.


Apologies for this terrible picture, my excuse is that I have two small kids who try to "help" if I try to do anything while they are awake, so I had about five seconds to take daytime photos!


So what do you think? I think all I need is a couple of plastic dinosaurs to stick in there and it'll be perfect.......and I'm not even joking :)

I have a couple of really great projects (great in that they weren't difficult, didn't take forever and saved me a butt load of money) completed for the kids rooms that I'll be sharing in the next free days.

Until then, I'd love you to say hi in the comments!

Linda XXX


DIY paper sunburst mirror!

Maret 04, 2015 0


Who doesn't love a good starburst mirror?


 Seems like everyone and their sister is getting in on the trend at the moment,

(which incidentally always makes me wonder if I'm just so cool that people follow in my footsteps, taste-wise...or if I'm just so oblivious that I've been seeing these things subliminally for ages and then think I came upon the inspiration  honestly......the latter I suspect!)

but with their retro style and gorgeous gold glam-ness (totally a word) I think they are the perfect addition to any room. Any of MY rooms anyway ;)

So, I decided I wanted one for the big lonely space over my bed, which once our new diy headboard was in place just cried out for something dramatic (and round) to balance out the room. I had two options, pay over €100 for one from a home decor shop, or stalk my local secondhand shops in the hopes of getting incredibly lucky......

Now, I am both very cheap and very impatient, so clearly neither of these options was going to work. 

Enter option three....try and make one myself!!!

So I typed "diy sunbirst mirror" into pinterest and quickly realised that you could make one out of paper, woohoo!! So that's what I did.


First, I decided on the style of mirror that I wanted, and from my research on pinterest it was clear that I favored the ones with angled edges. So my first step was to draw out templates for a longer and a shorter piece. The longer was 8 inches long, and the shorter 6.


I cut these out, and then used them to cut approximately 20 of each from white card. Once they were all cut out I folded them down the center so that they would have a 3D effect on my mirror.


pardon my pyjama-clad knee


I then laid the out in a circle and added a styrofoam ring (bought in a craft shop for a couple of euro) on top to get an idea of the spacing and what looked best.


Then it was out with the trusty hot glue gun to attach them all to the back of the ring. A dab on the folded point of each piece did the job.


I worked my way around the ring, alternating the long and short pieces, and keeping them very close together to make sure they "popped up" and didn't end up looking flat. When I finished and flipped it over this is what I had.....


I then spray painted this with Rustoleum gold (the regular kind, not the "bright metallic" I usually use as they were out of it when I went o buy it...but I think the duller, less brassy gold actually works better in this room, lucky!).

This is where I must admit I made a big mistake....apparently styrofoam really doesn't like spraypaint....as in, it melts on contact with it! So I was left with a kind of weird looking, melty surround for my mirror, but I decided it had character!...and also, I was not willing to go back and re-do the whole thing at that point. So I stuck my mirror (bought on ebay, but you can get them in B&Q) to the back of that sucker, glued sone string to the back so it could be hung off a command strip hook over the bed, and called it a day.

And here she is again in all her wonky glory.......


I must admit I love it, I think it really finishes off that wall, and works really well with the grey.

Anyone else made something interesting out of paper?


Linda


DIY mini marquee sign!

Februari 25, 2015 0


 I've always been obsessed with marquee signs (blame my carny heritage), I think they can add such incredible drama and interest to a space, and also I firmly believe that there is no such thing as too much lighting, so there's that....

However, anytime I've seen proper marquee signs for sale they have always run into the hundreds of euros, and as my budget for something so frivolous is pretty non-existent I knew if I wanted one I'd just have to make it myself. (Also, I always seem to take it as a personal insult when I see things that I KNOW are simple and inexpensive to make going for such high prices. Mostly when I try to make these things there's a big element of "I'll show you!"...I know, I have issues)

So, I know that at some point in the future I want to make a proper, large scale marquee sign with full size bulbs, but first I thought I'd try my hand at making something really simple, with supplies anyone could get in a good stationary shop, and this is what I came up with.....


It cost me less than €12 all told, and I think it looks great! It really gives the effect of a proper marquee sign but is small enough that it can go on any mantel/shelf. Plus it's battery powered so it doesn't need to be anywhere near a socket, bonus!

First, I bought cardboard letters from a local stationers for €1.95 each....


 and sprayed them gold with this paint.......


I used a craft knife to slice off the back of these (be careful!), and then poked holes where I wanted the lights to come through. I didn't take a pic of this stage but you can see in this photo of the finished sign from the back what I ended up with.


Then I hot glued the letters to a piece of scrap wood that I had also painted gold, to form a base for the light.


And finally, I poked the battery powered LED lights through the holes I'd made. I got the lights in Penneys at Christmas and I used 2 sets, totaling 60 lights and costing €3.60, but any small LED string lights will work. (I would advise stocking up on those lights any time you see them, I'm constantly finding new uses for them)


And there you have it! I LOVE it, I think it looks really impressive for something that cost less than €12 and took just an hour to make. It was one of those ideas that just worked out really well, and I had a lot of fun making it.


What do you think? :)


Linda xxxx

Visit Linda's profile on Pinterest.


Quote Cushions

Oktober 09, 2013 0


I have been bitten by the typographical bug! All of a sudden I am aware of all the wonderful quote that I love and it would seem that I am on a mission to have as many of them in my house as possible! To that end, after finding these small cushions in B&Q for just €2.95 each (they have them in lots of colours) I decided to attempt some fabric-art. So I went to Silkes on Catherine St and found this textile marker for €1.95....


It did the job admirably.I did both cushions with it and I'm sure I'll get a couple more out of it, it shows no signs of running out thus far :) It did come in other colors but just primary shades.


I first tried out a "once upon a time" design for Em's room. I just went freehand with it, and I'm quite happy with it, but if I'd just had a bit of patience and measured out where the letters should go then that "a" wouldn't be wonky...grrr.....


I then decided I'd try a Yeats quote for a cushion for our bed (I'm aware it's not "for" but "because" in the poem, it wouldn't fit!). I'm not as happy with this one, it's pretty wonky. I really want a set of alphabet stamps but thus far I've been too cheap to buy some online, but given the amount of these type of projects I've been doing over the last couple of weeks I reckon I'll just have to bite the bullet and order a set.


Here they are again, in all their wonky glory!


x

Entri yang Diunggulkan

my favourite interior trends this season